Safe zones & perimeters
How to Build a Safe Zone Perimeter That Holds in Zombies Aren't Real
Measure your firing lanes before enclosing a single street. Here is what each safe zone cell costs, how building heights shape garrison sightlines, where to cut gates for fleeing civilians, and how Broadcast and Evacuation Corridors fill a compact perimeter without letting hordes inside.
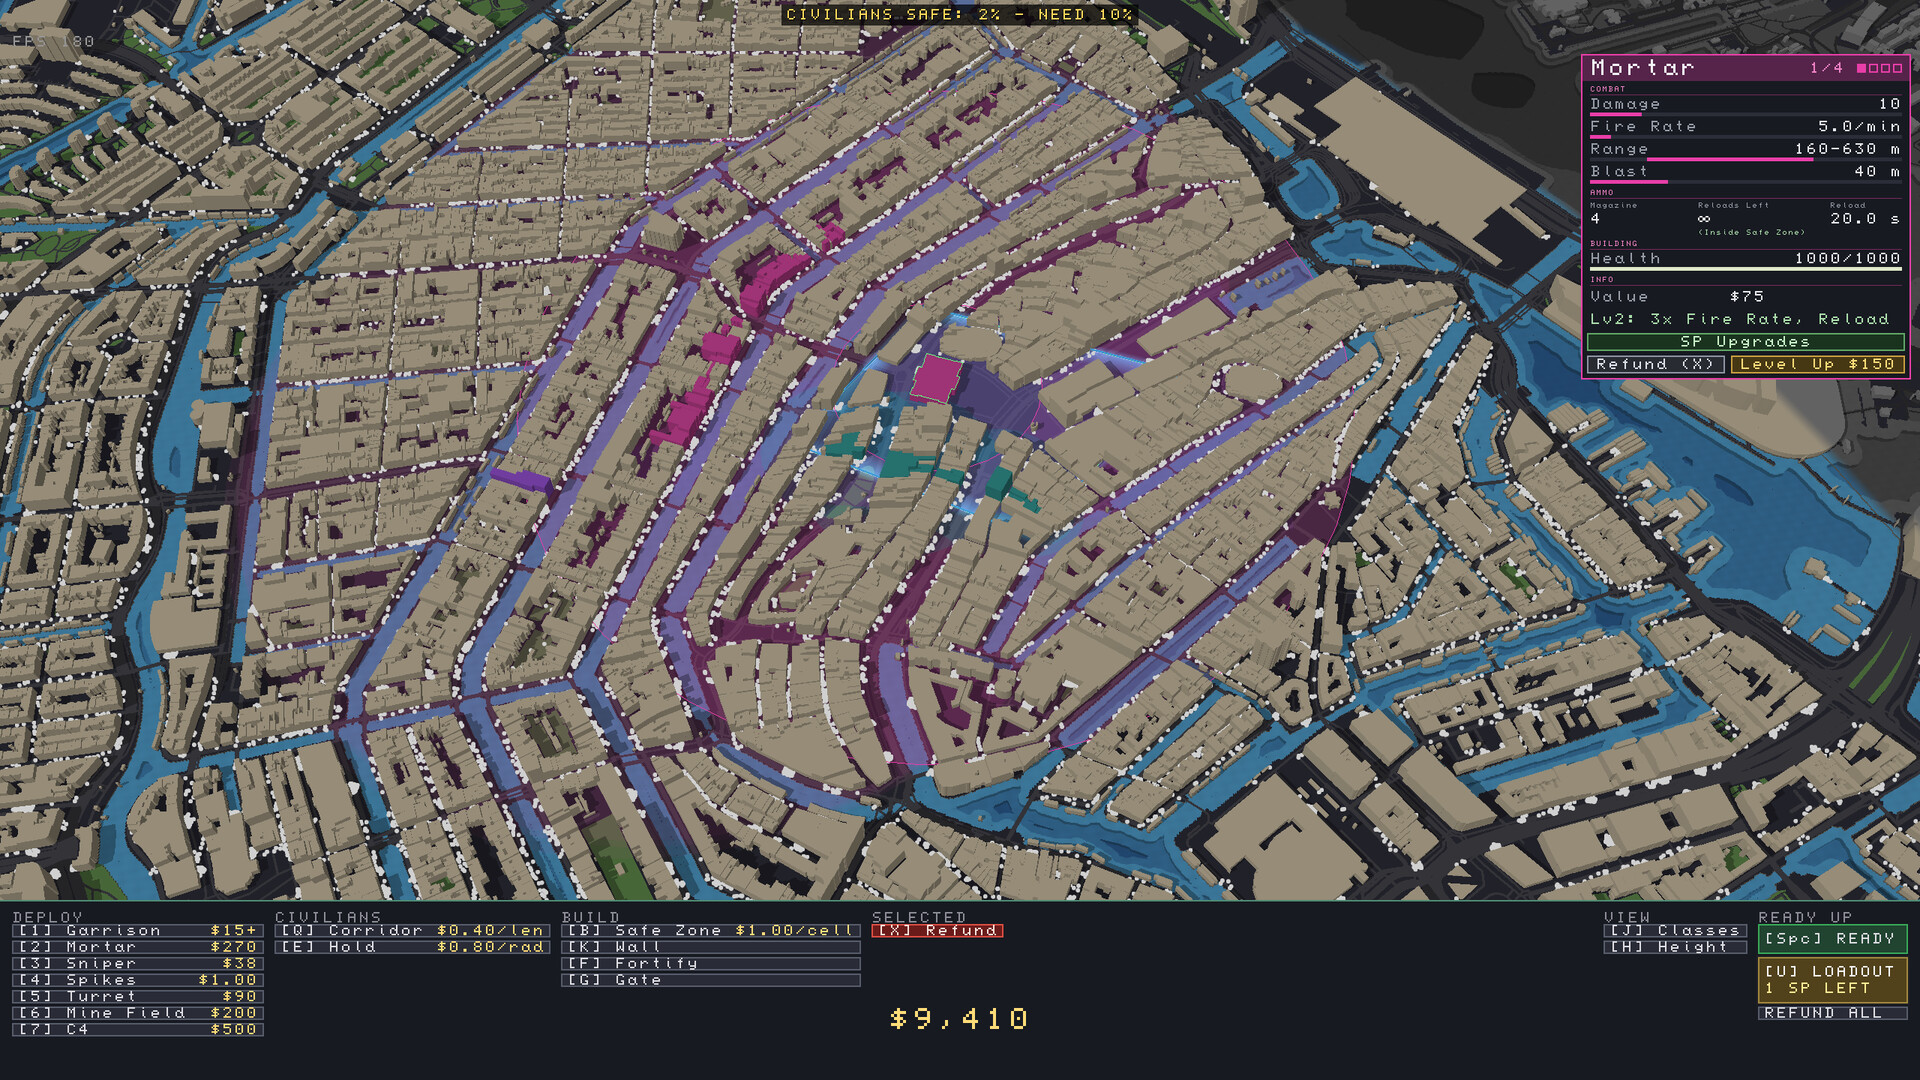
A safe zone in Zombies Aren't Real only holds if you measure your sightlines before you draw its walls. Safe zone ground is priced per cell ($1.00 per cell in the early scenario shown on the official Steam store page), and every stretch of perimeter you enclose requires clear gunfire to stop zombies chewing through it. Instead of circling an entire neighborhood first and hoping you can afford defenders later, pick the buildings with unobstructed street views, place your garrisons, draw a compact perimeter inside their firing circles, and open gates strictly on the roads civilians use to approach.
This perimeter guide explains what each safe-zone cell costs, how to line up a garrison's fire lane, and where to put gates civilians can reach. It also covers how Broadcast and Evacuation Corridors work together, and how to fix two common layouts: a wall too long to defend and a gate facing the outbreak. For your first mission, use the beginner guide; for defender costs and roles, see the units guide.
Tips that actually change your run
Each of these is a decision you make in the paused planning phase or in the first minutes of an outbreak — the ones that move the civilian bar rather than just tidy up your perimeter.
- Read the civilian target bar before you build anything. The early capture shows a "Civilians safe: 2% - need 10%" requirement, and your Bronze-to-Ruby badge is decided by that percentage, not by how much map you enclosed. Planning toward the stated number keeps your cash on defenders instead of empty cells.
- Place one Garrison, then draw the wall inside its range ring. Select the emplacement to see its arc, and only enclose blocks that arc actually covers. Walls outside every firing lane are just a timer for the horde.
- Put Snipers on dark-blue rooftops and let elevation do the work. Toggle the height overlay with V; at $38 the Sniper is the cheapest unit on the planning menu, and official battle stats show well-elevated Snipers out-killing Garrisons down long avenues.
- Spend your Turret money on one approach, not the whole perimeter. At $90 a Turret brings focused burst gunfire with fixed ammo and no reload, so it belongs on the one wall corner, bridge exit, or alley you have already watched zombies funnel through.
- Open gates on the side civilians walk in from, and leave the outbreak edge sealed. A gate facing the red infection markers sends fleeing crowds across your heaviest firing lane and lets pursuers follow them in.
- End every Evacuation Corridor at the gate itself. Since v0.43.1 civilians follow corridors along streets around buildings and straight through the entrance, and panicked crowds blocked by a wall turn toward the nearest gate instead of running back into the horde.
- Only fire Broadcast where a gate already exists. A Civic Broadcast pulls nearby civilians to the boundary; without an open gate on the same approach road they pile up outside your wall.
- Drop a Hold ring on busy intersections to sweep the alleys. The outer ring collects scattered citizens and the inner ring keeps them clear of exposed outer walls while a corridor walks them in.
- Leave one Baited avenue instead of walling off every road. A fully sealed district makes hordes chew through random buildings; a single deliberate approach road with two overlapping garrisons is firepower you can actually aim.
- Bank one heavy ability for the first breach. Cash units can only be bought during planning, while loadout abilities cost 0 scenario cash mid-battle — so keep a Helicopter or Air Strike in reserve rather than opening with it.
- Hold manually aimed strikes and C4 while civilians are in the blast. In v0.43.1 Mortars, Mine Fields and helicopters no longer kill civilians or damage safe-zone walls; manual strikes and C4 still can.
- Press
Refund Allduring planning when a campaign stage widens the map. It returns 100% of your spent cash, which is the cheapest way to redraw a tight perimeter around better terrain instead of defending yesterday's walls. - Split districts in two-player co-op, and do not be afraid to restart. Two-player online co-op lets each player own a district's firing lanes, and the developers state plainly that losing is still fun and encourage restarting with a different plan rather than nursing a collapsing perimeter.
Community strategy guides also report that defenders stationed inside an intact safe zone get unlimited ammunition reloads, a bonus lost the moment a wall segment breaks — one more reason a small, fully covered ring beats a long, half-watched one.
Measure before you build: cell cost and garrison sightlines
In the official planning-screen capture, a $1.00-per-cell safe zone sits alongside a $9,410 scenario budget and a "Civilians safe: 2% - need 10%" requirement. Cell cost looks cheap one square at a time, but enclosing four or five city blocks consumes hundreds of cells while multiplying the wall length you have to guard. Selected fortifications in the store screenshots display finite structure durability (building health 1000/1000), meaning an unguarded wall is only a short delay, not a permanent barrier.
Work from your firing positions inward rather than from city streets outward:
- Check rooftop elevation (
V) and special buildings (C) first. Press V during the planning phase to toggle the height overlay, where darker blue rooftops indicate taller structures. Real-world OpenStreetMap blocks obstruct line of fire: a garrison tucked behind a taller apartment block cannot shoot the street on the far side. Press C at the same time to spot Civic, Trade, Armory, and Rescue buildings worth anchoring inside your perimeter. - Place Garrisons before drawing boundaries. Drop a Garrison into a building that looks straight down a bridge exit or wide intersection, click it to inspect its range ring, and trace your safe zone cells inside that visible arc. If a corner of your wall bends behind an unguarded block, pull the boundary back until gunfire covers every outer edge.
- Add an inner "Castle" fallback compartment. Community strategy guides report that defenders stationed inside an intact safe zone receive unlimited ammunition reloads (turrets excepted), and lose that advantage the instant a wall segment breaks. Drawing a smaller secondary safe zone behind your main perimeter keeps inner rooftop defenders supplied if an outer street wall is breached.
- Leave one "Bait" avenue instead of walling off every road. Sealing an entire district with no open path causes hordes to bash unpredictably through random buildings. Use standalone walls (K) and natural water barriers to funnel zombies down one deliberate approach road where two or three garrisoned buildings overlap their sightlines.
- Use
Refund Allwhen campaign stages expand. Multi-stage city campaigns widen the map boundaries after each victory while carrying over your old zones. When a new stage opens fresh bridges or shifts outbreak vectors, click Refund All during planning to recover 100% of your spent cash and redraw a tight perimeter around better terrain.
Where to place gates and route crowds with Broadcast and Corridors
A sealed perimeter traps everyone outside with the horde. Your starting safe-zone coverage rarely needs to match the scenario's final survival goal because every civilian who enters through a gate (G) during the outbreak counts toward your saved percentage.
Place gates only on the side civilians walk in from — residential avenues, commercial plazas, and bridge ends facing away from the red infection markers — and keep outbreak-facing edges sealed with solid walls (K). Once your entrances are set, combine three crowd-control tools to fill the zone quickly:
- Broadcast (
CCivic function): Activates a building inside your safe zone to call nearby civilians toward your perimeter. Broadcast pulls crowds toward the zone boundary, so pair it with an open gate on the same approach road; without a gate, gathered citizens pile up outside the wall. - Hold: Establishes an outer gathering circle and a tighter inner waiting ring. Use a Hold ring at a busy intersection to collect scattered citizens off side alleys and keep crowds clear of exposed outer walls.
- Evacuation Corridor: A drag-and-drop lane that speeds civilians toward safety. Start a short corridor inside a Hold ring or dense boulevard and end it right at your gate. In Update #1 (
v0.43.1), Evacuation Corridors route civilians along streets around buildings straight through a gate at the lane's end, calm citizens near a gate walk inside on their own, and panicked crowds turn toward the nearest gate when blocked by a wall instead of running back into hordes.
Two safe zone layouts that fail (and how to fix them)
Almost every collapsed perimeter comes down to one of two planning errors:
1. Enclosing too many city blocks
Drawing a wide ring around half the map feels safe because the starting "Civilians safe" meter jumps immediately, but the layout collapses within minutes of pressing Ready. Hundreds of $1.00 cells drain cash needed for defenders, tall mid-block buildings create blind wall stretches no garrison can see, and the first undefended breach strips unlimited reloads from the entire zone at once. The fix: shrink the zone to the blocks your garrisons actively cover, and let gates plus Broadcast bring outside crowds in over time.
2. Opening a gate toward the zombie spawn
Cutting a gate on the wall facing the infection origin invites two disasters at once: fleeing citizens sprint straight through your heaviest firing lane (where explosive splash damage or crossfire kills them), and pursuing zombies pour directly behind the crowd into the open entrance. The fix: seal every zombie-facing street with solid walls (K), move gates (G) to the rear or flank avenues civilians approach from, and connect those safe entrances with a short Evacuation Corridor.
How defenders, civilian scoring, and the opening phase fit in
Your safe zone boundary is only as strong as the permanent weapons stationed inside it. During planning you spend cash on rooftop Snipers, choke-point Turrets, building Garrisons, ground traps, and elevated Mortars, while saving loadout slots for mid-battle emergencies when a wall is about to buckle; upgrades and refunds let you reinforce one good rooftop angle rather than scattering weak guns everywhere. See our full price table and scenario loadouts on the Zombies Aren't Real units and defense page.
Eliminating every zombie wins the mission, while the share of civilians still alive at the end determines your score and Bronze-to-Ruby scenario badge. Because unprotected citizens outside your walls get infected and swell the horde, fast crowd movement directly reduces late-stage pressure, and choosing between Rescue Airlift (which permanently banks evacuees even if the zone later falls) and Militia shapes how you handle forward buffer zones. Read how to save more civilians in Zombies Aren't Real for full crowd-preservation tactics.
Every scenario opens in a paused planning phase before a single zombie spawns: read the civilian target bar at the top, toggle rooftop height (V) and building classes (C), draw your safe zone and gates, assign loadout options (Tab), and press Ready (Space) to run the live outbreak at 1x to 8x speed. Walk through that complete first-mission sequence step by step in our Zombies Aren't Real beginner guide.
Where to go next
- Zombies Aren't Real units and defense — planning-menu prices, battle loadout options, post-run kill stats, and unit combinations by street type.
- Save more civilians in Zombies Aren't Real — how civilian scoring works, Broadcast/Hold/Corridor routing, Airlift vs. Militia, and when to restart a run.
- Zombies Aren't Real beginner guide — step-by-step opening checklist from reading the target bar to pressing Ready on your first city map.
- Zombies Aren't Real cities — city-by-city layouts, bridge choke points, safe-zone anchors, and Steam Workshop scenarios.
Facts checked 2026-11-20 against the official Steam store page and screenshots (snapshot 2026-11-16), Update #1 (v0.43.1) patch notes, and community strategy guides.